AVINE Video Client 3
Quick Reference
(Service Release 1 (SR1): October 2013)
Table of Contents
Overview
The Video Client 3 is a fast versatile video display and analysis tool used to monitor, taking and analyzing data that is produced by image sources, such as video cameras. The Video Client was originally written for monitoring and measurements at Photo-Injector Test Facility Zeuthen (PITZ). But it is made in a generic way so that it is also useful for other sites than PITZ.
Brief list of possibilities:
- receive live video as well as take sequence of video images from live sources
- monitor what is going on (see electron beam, see laser beam, see dark current, see diagnostic devices in the beam pipe)
- online-analysis of the beam images (spot size, position, shape, ...)
- optimize the beam image quality before data is taken and stored permanently
- do manual data-taking
- do semi-automatic data-taking (control of laser shutter)
- correlate behaviour between spot-size, position and shape and "moving" experiment parameters (Online-DAQ)
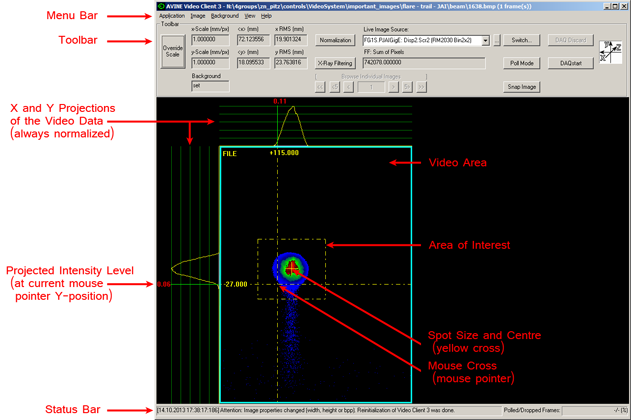
|
| Figure 1: Main Application Window |
| (click to enlarge) |
What's new in Service Release 1 (SR1)
- Features
- browse individual images if more than one image has been grabbed/loaded
- failed grabbing attempts can be reviewed and kept, repeated etc.
- added video image's event number to Online DAQ
- enhanced Zoom Panel
- improved Histogram Panel
- enhanced False Color Table Panel
- save human readable video image header format side-by-side to images
- drag and drop of images/background from explorer window to main window (load image/background)
- Fixes
- major rewrite of drawing video image and decorations
- improved responsiveness of GUI
- ALT-F4 handling fixed
- crash on some scrollbar actions on Zoom Panel
- Cosmetic Changes
- Sum Of Pixels now shows zero (0.0) if zero, not one (1.0) like it was before
- if scale factor is not set, and RMS values on toolbar are shown with unit 'px' instead of 'mm'
- Polled/Dropped frames moved from Side Panel to status bar (bottom right of main window)
- clear background keyboard shortcut CTRL-C removed
- added display of bits per pixel to File Preview Dialog
For details, please see release notes.
Features of the program
- Spot position and size calculation using Fourier analysis
- Spot position and size calculation using Straightforward statistics
- False color (classic, MATLAB JET-like) and grayscale mode
- Projections of the video signal (in X and Y)
- Printing of video images as well as the whole program window
- Live video-mode (polling)
- Acquiring sequence of images (grabbing)
- Saving and loading of raw images and backgrounds using application-specific (IMM, IMC) and widely used format (Windows BMP)
- Background subtraction
- Acquiring backgrounds using grab single background, add to background, envelope background and average background
- Snapshot mode (video snapshot to BMP file)
- Automatic acquire of certain control system properties (parameters of the experiment) for simplified correlations (so-called Online DAQ)
- Automatic acquire of certain control system properties in order to save side-by-side to video frame(s)
- Scaled values (instead of pixel values obtain results directly in millimeters)
- Image preview on loading files
- Semi-automatic datataking of background and signal frames (called: GrabAndSave), interfacing of some shutter, e.g. Laser shutter
- X-Ray filtering
- Zoom Panel
- Histogram Panel
- False Color Table Layout Panel
- Selectable area of interest, either circular or rectangular (all calculations are only done there and not
on the whole video frame)
- Free field on toolbar with the following implemented functions
- Sum of pixel values of video area (Sum of Pixels)
- Cooked pixel value under mouse cursor (Cooked Value)
- Mean value of pixel values of video area (Z mean)
- Rms value of pixel values of video area (Z rms)
- XY Correlation Coefficient of video area (XY Corr (-1..1))
- Tilt factor of video area (XY Tilt)
- XY Angle of Regression Line (XY Angle [�])
More technical:
- Works over Remote Desktop (Microsoft Remote Desktop Connection, VNC, Timbuktu)
- Compatible with Multi-Monitor setups
- Video frame transfer from server to Video Client 3 can use multicasting (configurable)
- XML config file with speaking names
- Video System 3 video data interface (compatible with Video System 3 sources)
Menu description and quick reference of functions
| Menu | Entry | Submenu | Description | Default |
|---|
| Application |
Area of Interest | Rectangular | Switches to rectangular area of interest.[1] | On |
| Circular | Switches to circular area of interest. [1] | |
| Color Mode | Grayscale | Switches on grayscale color mode [2] | |
| False color | Switches on PITZ false color mode [3] | On |
| JET False color | Switches on false color mode similar to MATLAB JET [4] | |
| Free Field | Sum of Pixels | The sum of all pixel values of the current area of interest of the image displayed, is shown. [5] | On |
| Cooked Value under Cursor | Displays the pixel value (depth) of the pixel that the mouse cursor points to. In addition, the maximum pixel value, according to bit depth of the image, is printed. [5,7]
| |
| Z mean | Displays the mean value of all pixel values inside the area of interest. [5,6,8] | |
| Z rms | Displays the rms value of all pixel values inside the area of interest. [5,6,8] | |
| XY Correlation Coefficient | Displays the XY correlation coefficient of the pixel values inside the area of interest.[5,6,8,9] | |
| XY Tilt | Displays the XY Tilt value of the pixel values inside the area of interest.[5,6,8,9] | |
| XY Angle of Regression Line | Displays the Angle of the Regression Line (unit [degrees]) of the pixel values inside the area of interest.[5,6,8,9] | |
| Normalization | | Switches normalization of the video data on and off | |
| Projection mode | X Projection | Switches X projection on and off | On |
| Y Projection | Switches Y projection on and off | On |
| Off | Switches displaying of all projections off | |
Statistics Mode |
Fourier | Switches on Fourier statistics (slow, more precise, less sensitive to noise) | |
| Straightforward | Switches on straightforward statistics (using MEAN and RMS formula) (fast, less precise, sensitive to noise) | On |
| Streakcamera | Streak image analysis (experimental) | |
| Off | Switches off statistics | |
| X-Ray filtering | | Switches X-Ray filtering on and off | |
| Keep Aspect Ratio | | Switches the "Keep Aspect Ratio" on and off. If on, the program resizes the video frame inside the application window to respect the proper aspect ratio of the video frame width and height. | On |
| Stay on top | | Switches the "Stay on top" on and off. If on, the program is on top of all other windows all the time. | |
| Offline | | One can enable/disable Offline Mode (all online control and video system connections are cut when Offline) | |
| Preferences | | Shows up the preferences dialog to set up snapshot output directory, set Online DAQ configuration file as well as output directory. |
| Reload Server (Camera) List | | If one comes to the conclusion that in the Live Image Source combo box there should be more servers listed or one wants to remove servers from the list not available right now, reloading the list may help. |
| Print image | | Prints the current image (can also print to electronic logbook if a proper printer driver for it is installed) |
| Print whole window | | Prints the whole application window (can also print to electronic logbook if a proper printer driver for it is installed) |
| Quit | | Quits (exits) the application |
| Menu | Entry | Submenu | Description |
|---|
| Image | Load | | Loads in raw images (either IMM, IMC or BMP file format) |
| Save | | Saves raw images (either IMM, IMC or BMP file). Raw means that no image processing (x-ray filtering, normalization, background subtraction, false colours) is applied. One also has the possibility to save important experiment data (like klystron forward power) together with the image file(s) to a text file. If saving multiple images to BMP file, one is not able load them in again into the Video Client as a bunch. |
| Grab | 1 Frame | Grabs a single video frame from currently selected Live Image Source (see toolbar). |
| 2 Frames | Grabs two video frames. The displayed image will be an average image of these two images. All calculations are performed on each individual video image and are then averaged. [10] |
| ... | ... |
| 200 Frames | Grabs 200 video frames. The displayed image will be an average image of these 200 images. All calculations are performed on each individual video image and are then averaged. [10] |
| Grab and Save... | 10 Frames | Grabs a sequence of 10 images and 10 background source images and saves them to disk |
| ... | ... |
| 100 Frames | Grabs a sequence of 100 images and 100 background source images and saves them to disk |
| Poll | | Start or stop Poll mode (live video) |
| Snap | | Saves currently displayed image (with image processing applied) to BMP file with timestamp to folder configured via Application->Preferences. |
| Analyze | | Analyzes the current video buffer again (after one changed some settings like normalization, x-ray filtering, change to AOI...) |
| Menu | Entry | Submenu | Description |
|---|
| Background | Load | | Loads in the current background image (BKG, BKC or BMP file format) |
| Save | | Saves the current background image (BKG, BKC or BMP file format) |
| Grab | | Grabs a single background that automatically replaces the current background image. |
| Add | | Adds a background to the current background image (addition). |
| Get->Envelope | 5 Frames | Grabs 5 images in a row, creates an enveloped background image out of them and puts this image as the current background image. [10] |
| ... | ... |
| 200 Frames | Grabs 200 images in a row, creates an enveloped background image out of them and puts this image as the current background image. [10] |
| Get->Average | 5 Frames | Grabs five images in a row, creates an averaged background image out of them and puts this image as the current background image. [10] |
| ... | ... |
| 200 Frames | Grabs 200 images in a row, creates an averaged background image out of them and puts this image as the current background image. [10] |
| Show | | Shows the current background image |
| Clear | | Clears the current background image |
| Menu | Entry | Description |
|---|
| View | False Color Table Panel | Shows a panel where the current false color table is drawn as a stripe. |
| Histogram Panel | Shows a panel where the histogram of the image that is currently shown, is drawn. |
| Messages Panel | For advanced users: Shows a panel where the messages of the application are logged. |
| Side Panel | Shows a side panel where additional information and options for the advanced user are shown. |
| Tine Server Address Panel | For advanced users: Shows a panel where an individual TINE video server address (to get video from) is possible to enter, check and enable. |
| Zoom Panel | Shows a panel where the currently displayed image can be zoomed in or out, also provides 100% view (1:1, i.e. 1 pixel on the screen is 1 pixel of the image source). |
| Menu | Entry | Description |
|---|
| Help | Quick reference | Shows this html help |
| About | Displays the about box of the program |
Footnotes:
| [1] |
In addition, the area of interest (AOI) is automatically reset to the biggest one possible. For rectangular AOI, the AOI will span the whole image dimensions.
|
| [2] |
If using grayscale color mode, problems observing weak signals could appear. The gray scales are linear distributed across the bit-depth of the pixels of the image. Depending on the capabilities of the monitor, only a fraction of the possible gray scales are shown physically. Dark gray tends to vanish into black.
|
| [3] |
PITZ false color mode was designed for improved recognizablity of weak signals in comparison to grayscale. In addition, distinguishing between low, medium, high and saturated intensity is much easier with it. Black means no, blue means weak, green means medium, red means strong and white means saturated signal. |
| [4] |
The colors are drawn like in MATLAB if JET color table is used. Slight finetuning has been performed so that the maximum (saturated) intensity of the displayed data is shown as white. |
| [5] |
If there are multiple video frames in the buffer, first of all the value is calculated for each individual frame in the buffer. Then the individual values are averaged. What is shown in the field is the averaged value. |
| [6] |
Please note that X-Ray filtering and background subtraction are performed before the value is calculated. So if these algorithms are in effect, they may alter this value! In contrast, normalization is performed after the value is calculated, so applying normalization does not influence this value. |
| [7] |
Please note that X-Ray filtering, background subtraction and normalization are performed before the value is calculated. So if these algorithms are in effect, they may alter this value! |
| [8] |
Please note that this value is only calculated if statistics mode is switched to straightforward or fourier. |
| [9] |
Dedicated documentation on XY Correlation Factor, Tilt and Angle of Regression Line is available on the Video System website. |
| [10] |
Any algorithm applied on a sequence of images is designed to perform best if there are no images lost in-between (so-called dropped frames) while recording the sequence. Due to shared resources like network bandwidth, drops may occur. The Video Client 3 will present a warning in this case. Also in rare cases it may happen that the image source is changed on server-side while the Video Client 3 records a sequence. Such events will be detected and an error message will be shown. As the recorded sequence is considered useless in this case, the sequence will be discarded.
|
Toolbar

| Control | Description |
|---|
| Toggle-Button Override Scale | If pressed, x-Scale and y-Scale boxes can be edited (and so scale values delivered with the image can be overridden by user-defined values) |
| x-Scale (mm/px) | Displays the scale value used to calculate the x-mean and x-rms values |
| y-Scale (mm/px) | Displays the scale value used to calculate the y-mean and y-rms values |
| <x> (mm or px) | Displays the currently calculated x MEAN value (only valid in straightforward or Fourier statistics) |
| <x> (mm or px) | Displays the currently calculated y MEAN value (only valid in straightforward or Fourier statistics) |
| x RMS (mm or px) | Displays the currently calculated x RMS value (only valid in straightforward or Fourier statistics) |
| y RMS (mm or px) | Displays the currently calculated y RMS value (only valid in straightforward or Fourier statistics) |
| Toggle-Button Normalization | One can see whether Normalization is switched on (button looks pressed) or off (button looks like not pressed). In addition, one can easily switch it on/off. |
| Toggle-Button X-Ray filtering | One can see whether X-Ray filtering is switched on or off. In addition, one can easily switch it on/off. |
| Live Image Source | One can select the current server where Video Client 3 will get video streams from. For each server address it is shown which camera is currently bound to that server (if any). If the combo box is opened it shows all servers which are in principle available. Items written in black show servers which currently provide video frames. Items displayed in gray show servers which do not currently provide video frames. The combo box flickers (red/white) if the status of the currently selected server changes. If the whole control is grayed out then no server is available at all. This could be due to the fact that the application's mode is currently set to offline. |
| Button [...] | For advanced users: Opens or shows Tine Server Address Panel (enter, check and enable individual TINE server video feed) |
| Switch... | Opens or shows camera switching panel (to switch a server to a different camera) |
| Toggle-Button Poll Mode | By this button one can quickly see whether poll mode is switched on or off and, if one wants to, switch it on or off. |
| FF: Sum of Pixels | The so-called 'free field' shows the sum of the pixels after background subtraction. The free field can show various values, see Application->Free Field menu entry. |
| DAQstart (DAQstop) | Starts/stops simple Online Data Acquisition (so-called Online-DAQ). If Online-DAQ is currently running the button is labeled 'DAQstop'. When pressing DAQstop, Online-DAQ is stopped and data that is still being buffered will be flushed to csv file on disk. |
| DAQdiscard | Can be used as a button to stop currently active Online DAQ and automatically discard the data (do not save to disk). |
| Icon showing Coordinate System | As an information for the user, this icon shows the used coordinate system inside the
video frame. Calculated values are shown using this coordinate system, where applicable. |
| Background | Indicates whether background image is set or empty. |
| Browse Individual Images | Is enabled if there is more than one image in Video Client's internal image buffer. One is able to browse individual images instead of averaged image and decorations, shown by default. |
| Snap Image | By pressing this button the user can save currently displayed video image (which contains image processing like background subtraction, normalization, x-ray filtering and applied false color table) to a Windows BMP file. The file name contains the current timestamp. The file is written to a special folder which can be configured via menu Application->Preferences. |
Description of the Zoom Panel
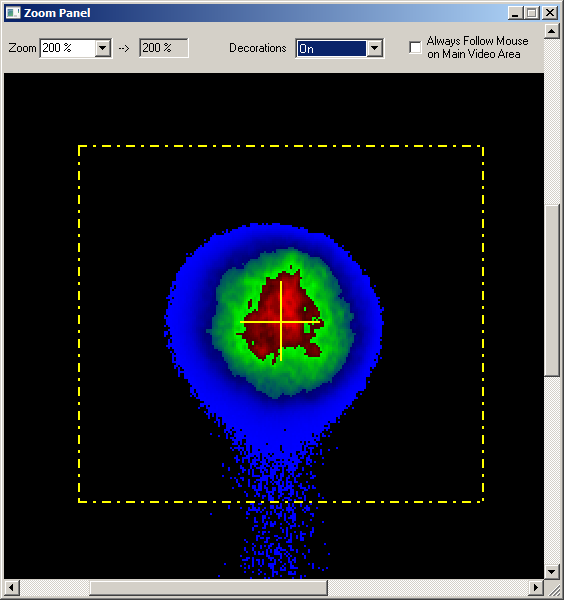
The zoom panel shows a magnified or demagnified part of the video image shown on the main application window. The zoom factor can be chosen from 1 to 1000% (10:1). Some predefined zoom steps are selectable in the combo box on
the left of the tool bar. To the right of the combo box, one can see which zoom factor is currently set in the
zoom panel. Using the second feature on the tool bar, one is able to choose whether or when decorations (mouse cursor axis, spot size and centre) are drawn on top of the scaled pixels. One can choose between On (Always draw the decorations), Off (never draw decorations) and Mouse (draw decorations if mouse pointer is inside zoom panel's video area). The third feature on the tool bar, called 'Always follow Mouse on Main Video Area', changes the Zoom Panel into a magnifying glass. If the checkbox is checked (alternative: one can press SHIFT key while moving mouse on main application window's video area), the scaled video area follows the mouse cursor in the main application window.
Description of the Histogram Panel
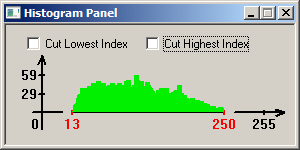
On the histogram panel, the absolute number of pixels that share a distinct pixel intensity (pixel value) are
shown across the x-axis. On the y-axis, the number of pixels that share the same pixel value, are plotted.
Note that only pixels inside the area of interest are taken into account for calculating the histogram. In case that only a certain portion of the histogram values are used throughout the image's pixel values,
the x-axis may be displayed discontinued. In that case, the lowest and highest index shown is displayed in red color at the x-axis.
In case of under and overexposed images, one is able to cut (remove) the lowest and highest index value from the histogram display, as in such case the number of pixels with those index values can be much more than numbers of other pixels values. Removing them from display can improve visibility of other histogram indices.
Description of the Side Panel

| Section | Label | Description |
|---|
| Image Buffer |
Number of Images | number of images the image buffer currently consist of |
| Width | width of each image in pixels |
| Height | height of each image in pixels |
| Format | current format of the image buffer [1] |
| Image Source | descriptive name (position), where the image(s) came from |
| Image Source ID | ID (unique number) of the image source |
| Area of Interest (AOI) |
Type | type of area of interest (rectangular or circular). [2] |
| Constraints | the actual values which define the area of interest. [2] |
| Normalization | Mode | One can switch between Top-Down normalization and Top only. The latter works like in Video Client 2. [3] |
| X-Ray Filtering | | Options to control X-Ray Filtering (equalisation of excessively raised (regions of) pixels using 3x3 matrix). [3] |
| Percentage | One can set the percentage the examined center pixel's value must stick out of the surrounding pixel's value before it is considered to require equalization. (1-200%) |
| Number of Pixels | One is able to choose the minimum number of surrounding pixels for which the percentage condition needs to be fulfilled before the center pixel is equalized. |
| CSV File Writing |
Delimiter | Shows the currently used CSV file delimiter. [4] |
| Decimal Point | Shows the decimal point used when writing CSV files. [4] |
| Grab and Save |
Laser Shutter Control | The control of the laser shutter in GrabAndSave function can be disabled. The status is shown here for reference. |
| Footnotes: | |
| [1] |
The data formats the Video Client 3 supports are: Gray8 (maximum 8 bits per pixel) and Gray16 (maximum 16 bits per pixel). In addition to the format, the effective bits per pixel currently set are shown. For example there exist Gray16 EBitPP=12 which means 16 physical bits per pixel, but the image source is only able to deliver 12 bits per pixel. The remaining 4 bits are not used and will not go into calculations. Only the effective bits are taken into account.
|
| [2] |
There are two types of Areas of Interest: Rectangular and Circular. The rectangular area of interest is defined by its bounding rectangle pixel positions left(l), top(t), right(r) and bottom(b). The circular area of interest is defined by its centre point (cx, cy) and its radius (r). There is always an area of interest set inside Video Client 3. The biggest rectangular area of interest spans the whole image dimensions. The biggest circular area of interest is a circle which is restricted to the image dimensions.
|
| [3] |
The setting is volatile. It will be lost if Video Client 3 is closed.
|
| [4] |
The current delimiter and decimal point for CSV files are tried to be obtained from Windows regional settings. Furthermore they can be specified in videoclnt3-config.xml. The config file takes precedence over what was obtained from Windows regional settings.
|
Description of the False Color Table Panel
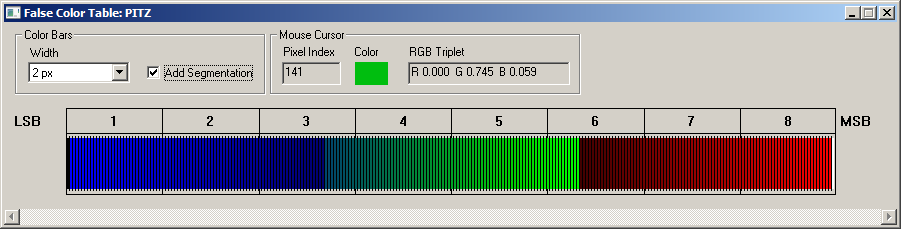
In the False Color Table Panel, the currently selected false color table can be inspected. The false color table is displayed as a thick horizontal bar-like stream of colors from lowest color index (LSB: Least Significant Bit) to highest color index (MSB: Most Significant Bit) [1]. The thick horizontal bar consists of thinner vertical solid bars, one for each color index.
Using the toolbar, the layout of the false color table can be adjusted to ones needs. One is able to set an absolute thickness (width) of each unique color bar or fit the color table to the width of the panel. In addition one is able to add segmentation bars in between each color bar (thin vertical lines). The thin vertical color bar below the mouse cursor, while one is moving along the big horizontal color bar, is displayed in greater detail
on the right hand side of the toolbar. The pixel index, the color itself and the RGB triplet (range of each component is from 0.0 to 1.0) are shown.
Note: If the width of the big horizontal color bar is smaller than the width of the window, the bar is scaled to fit the window width. If the width is bigger than the width of the window, the horizontal scroll bar is enabled.
| Footnotes: | |
| [1] |
Note that the highest color index depends on the effective bits per pixel setting of the current image(s) in Video Client's image buffer.
|
Keyboard-shortcuts
| Hotkey | Description |
|---|
| F2 | Switches statistics mode to Fourier statistics |
| F3 | Switches statistics mode to straightforward statistics |
| F4 | Switches all statistics off |
| F5 | Switches the color palette to grayscale |
| F6 | Switches the color palette to PITZ false colors |
| F6 | Switches the color palette to false colors close to MATLAB JET |
| F10 | Take a snapshot to file on disk of what is seen inside the video frame. |
| ALT-A | (Re-)Analyze the current image buffer (can be loaded image(s), grabbed image(s) or the last polled image) |
| ALT-P | Switch poll mode on/off |
| CTRL-G | Grabs a background and shows it |
| CTRL-A | Grabs a background and adds it to the current background image. Resulting background is shown. |
| CTRL-S | Shows the current background image. |
| ALT-F4 | Closes application gracefully |
| CTRL+arrow keys | Adjusts position of the area of interest inside the video frame |
| CTRL+shift+arrow keys | Adjusts size of the area of interest |
Mouse functions
| Function | Where | Description |
|---|
| SHIFT+move mouse | inside the video image region on main window | moves video area shown on Zoom Panel (like magnifying glass) |
| right click | inside the video image region on main window | Starts / stops poll mode |
| left click and drag | inside the video image region on main window | select area of interest |
File Formats
In this section, the different file formats used by the application are briefly explained.
| Format | Long name | Description |
|---|
| IMM | IMage Media | The IMM format is used for storing raw images. It can contain more than one image and contains the scale value of the images. The layout of the uncompressed binary file is very simple. An IMM file can get very big (1 MB - 100 MB). One should use this format only as a fallback solution, e.g. in order to load in the images into old video software which does not provide IMC loading. |
| IMC | Image Media Compressed | The IMC format differs from IMM that the images are compressed (using zlib). The compression ratio is usually 1:2-1:5. It is the preferred saving format, especially if one has taken more than 5 frames. Note that zlib compression is CPU intense. Saving a lot of images to IMC file may take a while, certainly longer than saving IMM. |
| BMP | Windows BitMaP file | The BMP format can be used for storing raw images or raw backgrounds. A BMP file can contain only a single image. When saving more than one image, each image is saved to individual file. When one saves a sequence of images out of Video Client 3 as BMP, one can only load them back in Video Client 3 as individual single images, not as a sequence. One should use this format only if one wants to load in these images into e.g. picture processing programs in order to postprocess them. |
| BKG | BacKGround file | The BKG file format is used for storing a raw, single uncompressed background image to file. |
| BKC | BacKground Compressed | The BKC format differs from BKG by two things. First, the images contained are compressed using zlib and second, there can be more than one background image inside. This allows for saving of source background images where an enveloped or averaged single background image may later on be created out of it. |
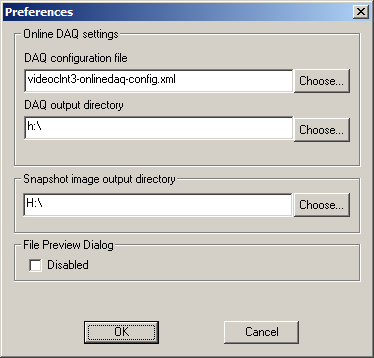
Preferences Dialog
| Option | Description |
|---|
| DAQ configuration file | One can view which Online DAQ configuration file is currently used. Also, one is able to select an individual Online DAQ file here, in order to have properties acquired and stored, which differ from the default property list. |
| DAQ output directory | One can enter or choose the directory where the csv files created by Online DAQ will be written to. |
| Snapshot directory | One can enter or choose the directory, where the snapshots of the currently displayed video image will be written to (as BMP file). |
| File preview dialog | If one experience problems with the file preview dialog (sluggish image selection due to slow access to files e.g.), one is able to disable the File Preview Dialog or reenable it (if it is wanted again). |
For advanced users and experts, there is an xml configuration file where one can find many advanced adjustment possibilities.
Further References
| Last modified: Oct 15, 2013 |
|
